Worried about poor CPU performance due to WMI provider host service utilizing all the processing power? Anyone can get rid of the glitch within no time following one of the methods we have for you.
There are a lot of services running in the background of a Windows operating system to offer a seamless front-end experience. They are highly important for the proper functioning of all Windows functions. Since they use the CPU of your computer, they can sometimes result in high CPU usage.
WmiPrvSE.exe or Windows Management Instrumentation Provider Host is one of the vital services that are present in Windows. One such issue, you might have encountered is the WMI Provider Host: High CPU Usage on Windows 10. There might be occasional misbehavior with the service, most commonly taking much of the available processing power of the machine, and here is how to deal with it.
What is WmiPrvSE.exe?
WmiPrvSE.exe or WMI Provider host or Windows Management Instrumentation Service is responsible for sharing information with software and scripts about the state of Windows and other vital information regarding the operating system. The most common type of information accessed by the software is Windows version, serial number, and BitLocker encryption status that are not readily available to see for the user. Apart from that, it also provides data for software and administrative scripts to other programs on your PC.
This service is important for most inbuilt applications and a few third-party apps like antivirus. Besides, one can even access the additional info in the Command prompt if required.
Why I am encountering WmiPrvSE.exe high CPU usage?
The WMI Provider Host process should ideally take less than 1% of CPU performance in idle state. In some situations, it is not even found in the Task Manager. It is common for the service to reach peak performance once in a while (10 – 20 minutes).
If there is any other characteristic you find, it is more likely to be a glitch that needs addressing. Failing to do so is going to affect the performance of the computer not having enough processing for other apps that you run in the foreground be it Microsoft word or Opera Browser.
While there might be a variety of reasons for WmiPrvSE.exe high CPU usage, the following two are the most common.
- The Windows Management Instrumentation Provider internal error.
- The high number of handles used by a process.
- High memory utilization for one or more processes which is known as Costly performance counters.
Apart from this Windows Management Instrumentation provider host high CPU usage error, there are various cases such as ravbg64.exe error and Runtime Broker.exe issue.
Fix WMI Provider Host High CPU usage on Windows 10
Any program causing high CPU usage can affect your computing experience. Since that one service is using all of your CPU, other programs on your computer will not have enough computing power available to it. Similarly, if you are facing this error due to wmiprvse.exe services, it can affect your computer’s performance.
Stopping/disabling the process, though could be done, is not a solution to the wmi provider host high CPU usage problem. Doing so will lead to most Windows applications not working properly. So troubleshooting is the way to go.
Note: The steps written below, though illustrated on Windows 10 applies to Windows 7 and Windows 8. If there is anything different for any other commonly used version of Windows it will be mentioned alongside.
Restart WMIPRVSE.EXE
The easiest way you could fix the encroachment of CPU usage is by restarting the Windows Management Instrumentation itself, that way any internal glitch is rectified.
- Open Run dialog (Windows + R) and enter ‘services.msc’.
- Or simply hit Windows Key and search for Services app.
- After that, you will see a list of all the services installed on your PC.
- In the service console, find the ‘Windows Management Instrumentation’ and right-click on it. From the pop-up menu choose Restart and you are done.
Command Prompt
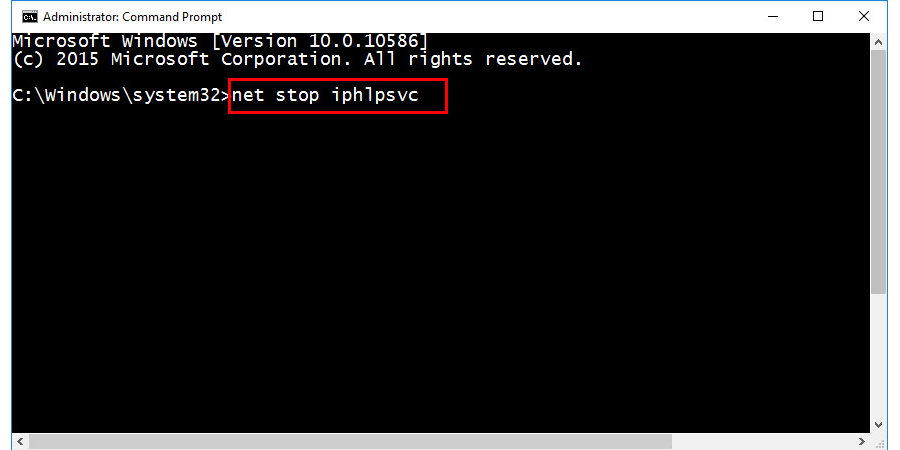
You can also restart other services associated with WmiPrvSE.exe to be sure. Press Win + x, select Command Prompt(Admin) [or Windows PowerShell (Admin) depending on the Windows version]. Type the following commands in the same order and hit enter after each command.
- Use the Windows Search feature to open Command Prompt as an administrator.
- Type the following commands one by one and press Enter after each command:
- net stop iphlpsvc
-
- net stop wscsvc
-
- net stop Winmgmt
-
- net start Winmgmt
-
- net start wscsvc
-
- net start iphlpsvc
- Finally, restart your computer to complete it.
Clean Boot
Not always the Windows Management Instrumentation is of fault, sometimes it is the application that causes high CPU usage of Windows Management Instrumentation Provider Host. Here is how to get it right:
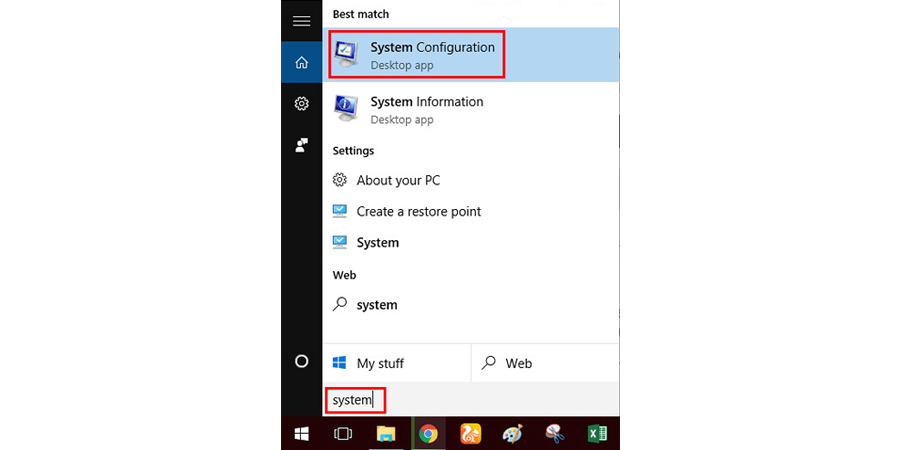
- Open System Configuration window from the Start menu.
- Type ‘msconfig’ in the Run window and press Enter.
- In the Services tab of the window uncheck Hide all Microsoft Services and click on Disable all.
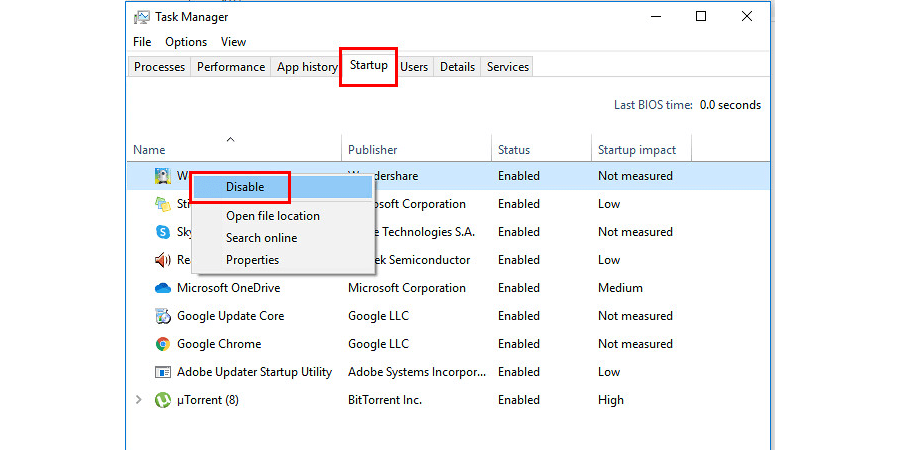
- In the Startup tab too, disable whatever is enabled by right-clicking on the application name and selecting Disable. Newer builds of Windows 10 will redirect you to the Task Manager to access startup applications.
- Press Ok and you are ready for the Clean Boot.
- Restart your computer and check if the WmiPrvSE.exe high CPU usage issue is gone.
- If the issue has gone, try enabling the applications that we disabled in Step 2 & 3 one by one and wait for 5 – 10 minutes to study whether the high CPU usage kicks in again.
- Or if any of the applications is found faulty, either uninstall or re-install the application.
Windows Troubleshooting
- Run the System Maintenance Troubleshooter by entering msdt.exe -id MaintenanceDiagnostic in the Run window.
- From there, the on-screen commands will guide you through the process.
- To open System Performance Troubleshooter, the process is similar to the command being msdt.exe /id PerformanceDiagnostic
The System Performance Troubleshooter is not enabled in the recent versions of Windows 10.
Identify & Troubleshoot manually
Now we will use the Event Viewer to find the host that causes error in the WMI Activity followed by manually finding the process from the Task Manager.
- Open Event Viewer. It is available in the WinX menu (Windows + X).
- For Windows 7, type ‘Eventvwr.msc’ in Run window and hit Enter.
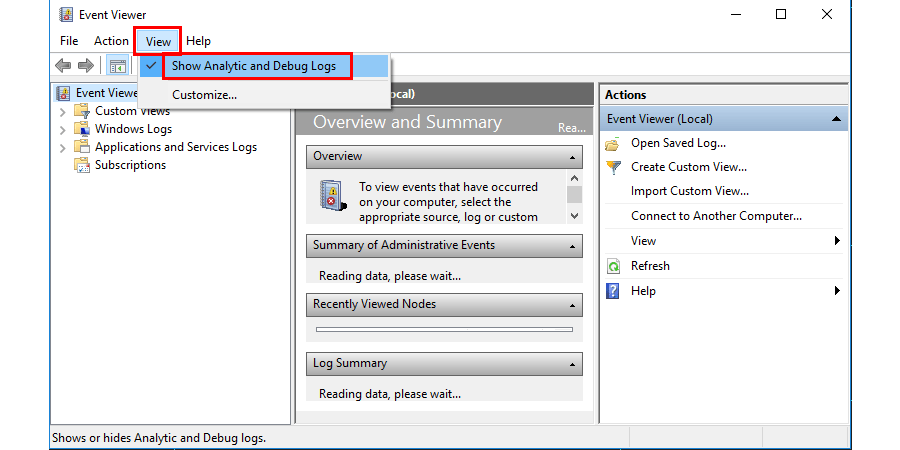
- In the toolbar, click View and select Show Analytic and Debug Logs option.
- Now in the left pane navigate to Applications and Services Logs > Microsoft > Windows
- After that, go inside WMI-Activity.
- In the WMI Activity folder, selecting the Operational will show WMI Provider Host’s operation logs in the center pane.
- Now scan through the center pane for error logs. Click on the most recent error, if any.
- Under the General tab look for a four/five-digit number preceded by ‘ClientProcessId =’. Remember this process id to spot the application.
- Now open Task Manager (Ctrl + Shift + Esc) and head to the Services Tab.
- Click on the PID header to arrange processes based on the process id. Now lookup for the process id to match with that we say in the event viewer window.
- If you have found a match, stop or reset the service from the right-click menu if it is any background service or inbuilt application. If it is a third-party application it is better to stop the process. An uninstall or re-install could solve the problem later.
- There is a possibility of the process id not available in the Task Manger’s services tab. That is because the supposed problem causing process is not active, the moment you check it. In that case, wait for the next error to occur in the Event Viewer and check immediately.
Scan & Fix Corrupted System Files
Apart from issues with other programs installed on your computer, issues with Windows 10 itself can also result in wmi provider host high CPU usage issue. There are many cases that can result in corrupted system files on your computer. For example, incorrectly installed Windows Updates can sometimes do this. And due to that, you can face issues with services like WMI provider host on your computer. In such a case Windows 10 allows you to easily scan and fix corrupted system files as shown here:
- Press Windows Key + R on your computer.
- After that, type cmd and press Enter in Windows Run which will Command Prompt.
- Type the following commands one by one and press Enter after each one.
- sfc /scannow
-
- Dism /Online /Cleanup-Image /CheckHealth
-
- Dism /Online /Cleanup-Image /ScanHealth
-
- Dism /Online /Cleanup-Image /RestoreHealth
- Doing so will make Command Prompt scan and fix all the system files of your computer. And it will fix wmi provider host high CPU usage error.
Conclusion
I hope the high CPU usage issue of WMI Provider Host should have been sorted out by now. In most cases, the issue should have gone while you are done with the first or second method itself.
If the problem still exists, even after trying all the methods there is some serious problem that you need to be worried about. It is best you get the help of a service executive for remote assistance or visit a service center nearby.
If you feel this article helpful please like, share, and follow our Facebook page and keep visiting our website for such tutorials and guides.


Leave a Reply